When recovering from training-related injuries, crutches become essential tools to support healing. They take pressure off the injured leg while preventing strain that could worsen the condition. Let’s walk through how to use underarm crutches – the type with padded tops that fit under your arms – safely and effectively for optimal recovery.
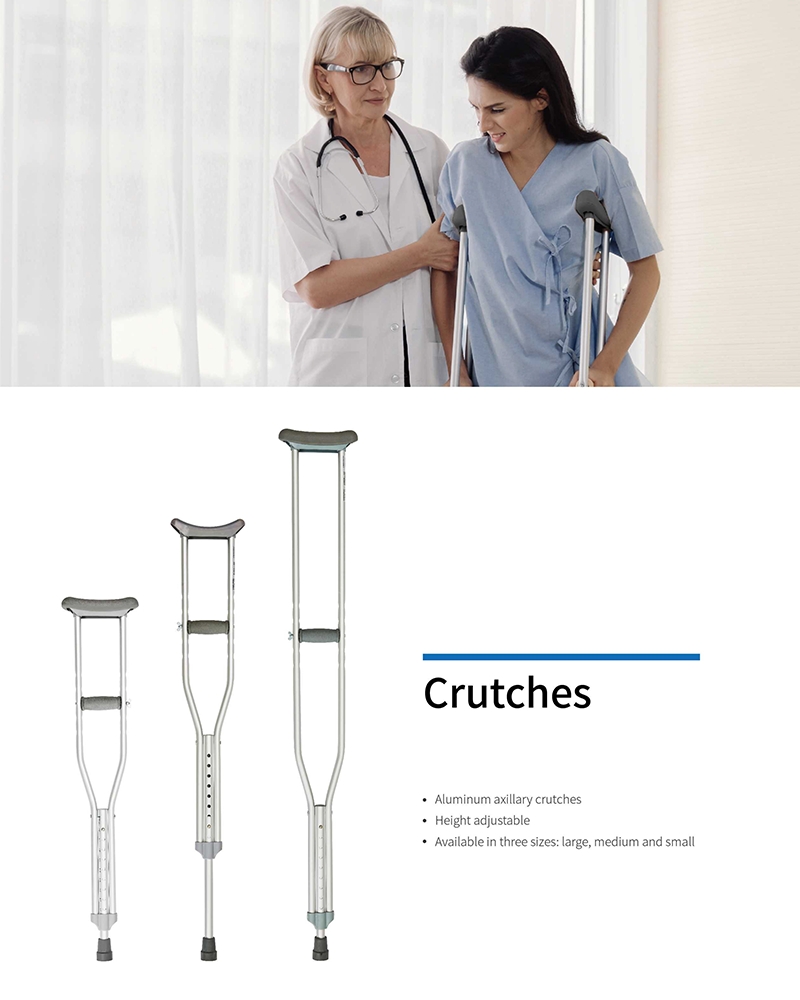
The support points of the armpit crutches are located in the armpit, upper arm, elbow and hand. It can rely on the chest, abdomen, shoulder girdle and arm muscles to provide strong support. It is quick and convenient to use. The armpit crutches can be used alone or in pairs, and can generally reduce the weight of the lower limbs by 80%.
Length determination
1.Two measurement methods
- The length of the axillary crutch is the individual’s standing height multiplied by 0.77; the length from the axillary to the heel in the supine position plus 5cm.
- The length of the axillary crutch is measured from 5cm under the axillary in the standing position to 15cm outside the fifth toe.
2.Handle position determined
The height of the handle is such that when the wrist is extended to hold the handle, the elbow joint is flexed 30 degrees or the handle is parallel to the greater trochanter of the femur. It can be adjusted to a suitable height by itself.
Note:
- The patient needs to wear normal shoes for standing measurement.
- The distance between the top of the armpit support and the armpit should be equivalent to 3 horizontal fingers(about 5cm). If it is too high, it may compress the blood vessels and nerves of the brachial plexus. If it is too low, it will not be able to support the lateral chest wall, lose its function of stabilizing the shoulder, and will lead to poor walking posture.
- When using crutches, the focus of upper body strength is on the hands, not the armpits.
- If upper limb strength is insufficient, a wheelchair or other aid should be used for walking instead of crutches.
How to use ?
- Swinging step:Suitable for patients with injuries to both lower limbs. It is a common method of starting walking. It has good stability but a slow speed.
- Hold the handrails tightly with both hands and use the strength of your arms to support your body weight
- Stretch out your crutches
- Move the center of gravity forward, and at the same time swing both lower limbs forward and land behind the line connecting the two cructhes
- Repeat the above process
- Swing over step: an advanced method after becoming proficient in the swing to step. It has a fast speed but slightly worse stability. Its scope of application is the same as the swing to step.
- Hold the handrails tightly with both hands and use the strength of your arms to support your body weight
- Stretch out your crutches
- Move the center of gravity forward, and at the same time swing both lower limbs forward to land in front of the line connecting the two crutches
- Repeat the above process
- Four-point step:It is suitable for patient who have good pelvic lifting muscle strength and a certain weight-bearing capacity, and it allows for more stabe walking.
When the affected limb is the right leg:
- First extend your left crutch
- Move your weight forward and step forward with your right leg(affected limb)
- Extend your right crutch
- Move your center if gravity forward and step forward with your left leg(healthy leg)
- Repeat the above process
- Three-point step:Suitable for patients who cannot bear weight on the affected limb or who have severe pain in the early stage of the affected limb and refuse to bear weight on the ground.
When the affected limb is the right leg:
- Support with left leg(healthy leg) and extend crutches
- Move your center of gravity forward and follow up with your right leg(affected limb) without bearing weight
- Support with two crutches, and move your left leg(healthy leg) forward to the point where the crutches touch down.
- Two-point step:It is an advanced gait after mastering the “four-point-step”. It has a faster walking speed and is applicable to the same scope as the “four-point-step”.
When the affected limb is right leg:
- Turn left(healthy side) and step out with right leg(affected side) at the same time
- Turn right(affected side) and step out with left leg(healthy side) at the same time
- Repeat the above process
- Go up the steps
When the affected limb is the left leg:
- Place the armpit crutches on the steps and stand firmly
- Move the bilateral axillary crutched to the upper step
- Follow up with your left leg(healthy leg) to the upper step
- Keep stable and move your right leg(affected limb) up to the upper step
- Repeat the above process
- Going down the stairs
When the affected leg is the right leg:
- Place the armpit cructhed on the steps and stand firmly
- Move the bilateral axillary crutches to the next step
- The right leg(affected limb)follows up to the next step
- Keep stable and move your left leg(healthy leg) to the next step
- Repeat the above process
Tips
- When using crutches, you should first adjust them to the appropriate height
- Hold the handles of the crutch with both hands to support your body, rather than using your armpits to apply force. There are important blood vessels and nerves in the armpits, and nerve damage must be avoided
- Before walking, check whether the crutch screws and rubber pads are stable
- Be sure to use cructhes on dry ground and keep the ground free of obstacles to avoid affecting your walking
- Wear appropriate length pants and non-slip shoes when walking
- If the effect is not good, you can consult relevant professionals for systematic evaluation and treatment
Post time: Apr-30-2025